It's a good time in the garden! Things are sprouting up (except the lettuce, blah. Planted that out too late I think) but the true successes are those that I weren't sure if they would make an appearance!
Every year I typically take cuttings of the mother plant for the winter and then cover mama plant with about 5-8 inches of pine needle mulching and pray that mama will come back.
The stevia got covered too late last year and didn't return despite having survived 2 years my garden when super-mulched (granted it was a dang, cold winter).
My lemongrass was unintentionally left all winter in a pot in the unheated and barely lit sunroom, but after taking pieces out of the pot there was still green and healthy white roots, so though I'm waiting for some real growth still now that they're back in the ground I can still cheer on for once the hardiness of grasses! Woohoo!
The real big news is that the lemon verbena which I took cuttings of that never ended up rooting up, survived under my mulch method and is looking lovely and pushing out leaf buds. I'll work on taking cutting earlier on this time because I don't like gambling like I did last year.
One of the sunchokes that I bought from a grocery store, kept in the refrigerator for months and then buried in a small bed looks like it's coming up. Unless there's some other strange fuzzy-leafed inhabitant in my garden bed that I should be aware of... I can't wait to anticipate potentially 10 ft tall chocolate scented flowers and root veggies! *dances*
FINALLY, my big thrill is the my Haight Ashbury may have survived the winter too (YES!). I was digging around the area I originally had planted it and pruned inch thick trunks when I noticed some growth of a purplish nature that I can only believe to be the hibiscus. The hole I dug had roots that were white and healthy looking too, and though the old plant parts that I had pruned were dead and dry looking, I've know from past experience that hibiscus are just like that until they get going and send new branches/shoots from the ground. More news on that another time in case I'm jumping the gun, but it's great to see things, especially uncertain things, making their appearance again.
Some days I with I was as tough as my plants are!
Monday, April 5, 2010
Sunday, April 4, 2010
Basil! I needs it! (blue basil)
Along with my penchant for ornamental peppers (well, nearly any chile pepper) and tomatoes I love BASIL. Who doesn't really? And I don't mean just regular ol' sweet basil, but all the VARIETIES of basil (like my mint fetish, but not at the same rate of invasiveness).
It's not just the smell/taste that I love about basil, but its cool ability to so easily cross with others in its family (that sounds a little wrong doesn't it) and such simple propagation (cut, add to water, wait for roots) makes me think of it as a saint among herbs.
So at the Memphis Master Gardener's Spring Fling earlier this year I got really excited when I saw a much coveted African blue basil plant and broke my plant buying moratorium (exotics/helpful perennials are more exempt from my new rule).
African Blue basil is a hybrid between an east African basil and "Dark Opal" basil, so it will unfortunately not produce true seeds (or seeds at all is what I've heard). Though considered rather ornamental with gorgeous lavender flowers, it is highly fragrant witch a spicy clove-camphor scent. Descriptions like that make me wish Smell-o-vision was available online!
The basil I bought was greenhouse grown and very nice and full, a great deal at $4 for its size and rarity. It was already had racemes ready to flower, but as I wanted a large, strong and healthy plant I cut the racemes off so it would put its energy into growth rather than flowering.

I took a few cuttings from the side of the mother plant too and popped them in water for rooting so it will be part insurance (in case the one outside gets killed) and part easy gift giving for those others who love basil. Life is good.
Interesting Links:
http://articles.sfgate.com/2005-07-23/home-and-garden/17383831_1_basil-cuttings-companion-plants
http://www.superbherbs.net/AfricanBlueBasil.htm
It's not just the smell/taste that I love about basil, but its cool ability to so easily cross with others in its family (that sounds a little wrong doesn't it) and such simple propagation (cut, add to water, wait for roots) makes me think of it as a saint among herbs.
So at the Memphis Master Gardener's Spring Fling earlier this year I got really excited when I saw a much coveted African blue basil plant and broke my plant buying moratorium (exotics/helpful perennials are more exempt from my new rule).
African Blue basil is a hybrid between an east African basil and "Dark Opal" basil, so it will unfortunately not produce true seeds (or seeds at all is what I've heard). Though considered rather ornamental with gorgeous lavender flowers, it is highly fragrant witch a spicy clove-camphor scent. Descriptions like that make me wish Smell-o-vision was available online!
The basil I bought was greenhouse grown and very nice and full, a great deal at $4 for its size and rarity. It was already had racemes ready to flower, but as I wanted a large, strong and healthy plant I cut the racemes off so it would put its energy into growth rather than flowering.
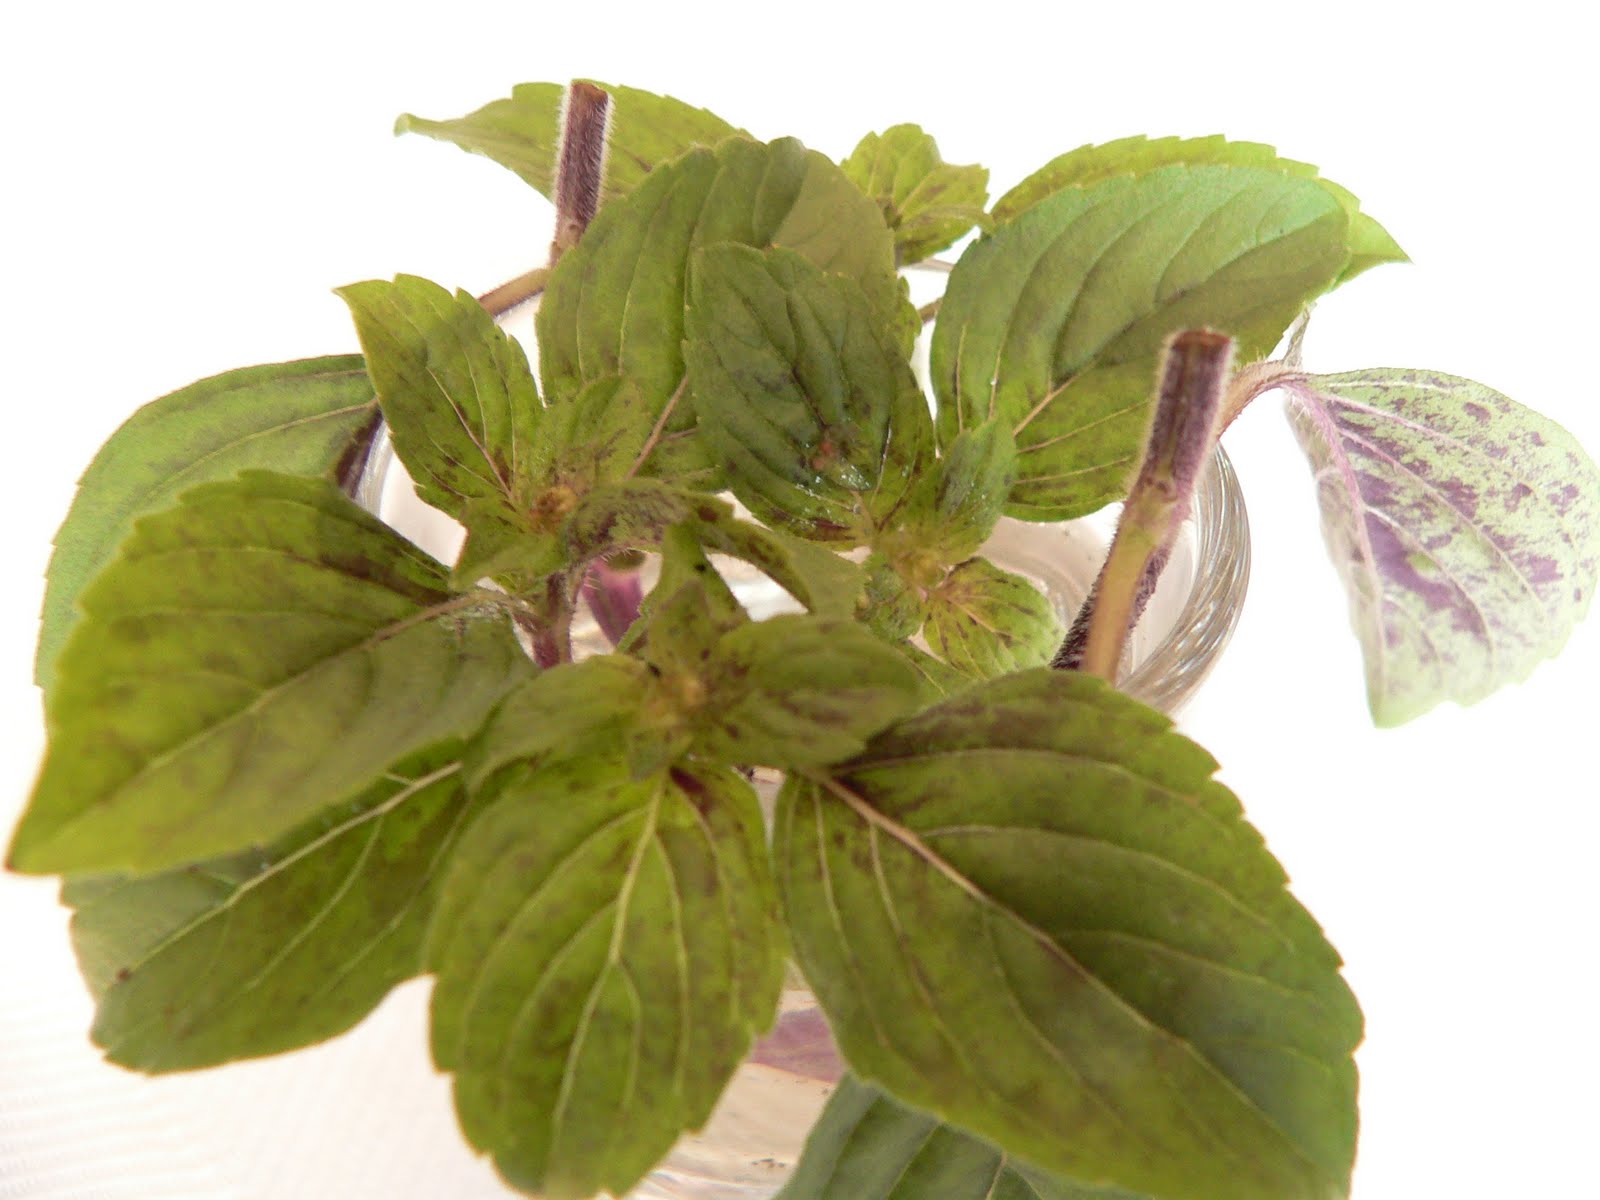
I took a few cuttings from the side of the mother plant too and popped them in water for rooting so it will be part insurance (in case the one outside gets killed) and part easy gift giving for those others who love basil. Life is good.
Interesting Links:
http://articles.sfgate.com/2005-07-23/home-and-garden/17383831_1_basil-cuttings-companion-plants
http://www.superbherbs.net/AfricanBlueBasil.htm
Friday, April 2, 2010
How Low can I go (cutting bulbs down)? Continuing the grocery store bulb growing tradition
I like not having to worry about those little things when cooking, like herbs or edible garnishes. I like even more to not have to run out to the grocery store for those items that I don't use that often, like green onions. BUT, I like it MOST when I don't have to re-purchase it and it keeps ALL year in the garden.
As I don't typically plan my meals, those little extra things that make a big impact to a meal like green onions, cilantro or rosemary come in handy when it's the garden and keeps well.
So after my success with re-growing green onions from the store and keeping the growing bulbs in my refrigerator then house and finally planted them out into the garden after a couple months, I decided to try something more exotic like fennel.
I had a recipe for bouillabaisse, the classic French soup, except mine was more of a dumbed down vegetarian version, and I didn't use fish (oh well).
The only thing is that I needed to use the entire bulb it says, and as my bulb came pre-cut (without roots) from the store, most people would cut a certain amount of the more brownish oxidized cut part off anyways.
So I cut a little less than a half inch from the bottom of the fennel (preserving for food use what I thought would be enough for the soup) and wondered just how much can a person cut off a plant for it to regenerate.
A few days later after sitting in a saucer of water:

I suppose that answers it for fennel!
I'll admit, I got the fennel too not just for food purpose and to experiment with, but if my experiment in re-growing it worked, I wanted to grow fennel partly for food but also tofeed deter the swallowtail butterfly caterpillars this year as I hear fennel is an excellent food source for them and the flowering heads of fennel attract beneficial insects such as hoverflies and helpful wasps.
Last year the caterpillars totally decimated my dill, parsley and turnip leaf crops (though the latter could have been turnip moths...) and so instead of grumbling like the mad woman I was last year, I'll working on trying to co-exist with the beasts. The adults are pretty and pollinators of course, but in their crawly form... I am ashamed to say, but I was chucking them over the fence in a passive-aggressive "I'm not killing you (just marooning you a little), but if you can make it over to my garden again for food, kudos to you" sense in attempt to save the vegetables/herbs.
Since my experiment on one fennel bulb was successful, I'll be getting a few more for use. I just need to find a bunch more recipes that involve fennel!
As I don't typically plan my meals, those little extra things that make a big impact to a meal like green onions, cilantro or rosemary come in handy when it's the garden and keeps well.
So after my success with re-growing green onions from the store and keeping the growing bulbs in my refrigerator then house and finally planted them out into the garden after a couple months, I decided to try something more exotic like fennel.
I had a recipe for bouillabaisse, the classic French soup, except mine was more of a dumbed down vegetarian version, and I didn't use fish (oh well).
The only thing is that I needed to use the entire bulb it says, and as my bulb came pre-cut (without roots) from the store, most people would cut a certain amount of the more brownish oxidized cut part off anyways.
So I cut a little less than a half inch from the bottom of the fennel (preserving for food use what I thought would be enough for the soup) and wondered just how much can a person cut off a plant for it to regenerate.
A few days later after sitting in a saucer of water:

I suppose that answers it for fennel!
I'll admit, I got the fennel too not just for food purpose and to experiment with, but if my experiment in re-growing it worked, I wanted to grow fennel partly for food but also to
Last year the caterpillars totally decimated my dill, parsley and turnip leaf crops (though the latter could have been turnip moths...) and so instead of grumbling like the mad woman I was last year, I'll working on trying to co-exist with the beasts. The adults are pretty and pollinators of course, but in their crawly form... I am ashamed to say, but I was chucking them over the fence in a passive-aggressive "I'm not killing you (just marooning you a little), but if you can make it over to my garden again for food, kudos to you" sense in attempt to save the vegetables/herbs.
Since my experiment on one fennel bulb was successful, I'll be getting a few more for use. I just need to find a bunch more recipes that involve fennel!
Thursday, April 1, 2010
Unenchanted meeting
My little tomato seedlings are doing poorly. As a matter of fact, I think they are kicking the bucket from damp off and now UV damage on my part (too impatient to get them out of the house and optimistically thinking that the UV rays would kill fungus/rid the seedlings of excess potential moisture...? I know, I know... hardening off, I did it a little too quickly and now I'm paying for it with dying seedlings, the surviving ones now splashed bleach white from the rays.
Luckily I had some leftover seed of 7 of the 13 varieties (lucky old 13, eh?) that I had planned to grow that I now get to re-grow. Woo.
Well, if things go poorly again in about a week or so, then I'm just going to have to buy some plants. And that would just make me want to express myself in words that I can't/shouldn't post on this blog.
Anywhos, I left the remaining potentially survivable (we'll see) seedlings on a tray on the ground away from my platform of newly sown seeds just in case damping off fungus spores want to travel and infect others like vampires. I returned a few hours later to have a look-see at my pathetic seedlings when I noticed that there was a disturbance in one pot-verse:
 Can you see it?
A little bit closer...
 Yep. That's a TOAD. That buried itself. Between 2 seedlings. In a pot just large enough to hold its warty little self.
*SIGH*
I watered the plants a bit taking care to give the toad a bit of a cold shower and wandered at why the heck it didn't choose some of shadier regions of the garden that are relatively plentiful (and easier to get into).
I figured this was a lesson learned so I raised the crummier seedling tray up a bit on some bricks, took out the toad inhabited pot and left it on the ground so when Mr. Toad (where was Mr. Frog?) decided to hop on out he didn't have to go mini-skydiving in the process.
Naturally, when I took out Mr. Toad's pot the scamp then decided to vacate.
*SIGH* (again)
I'm sure we'll meet again Toad (most likely in one of my other pots or plots.
Luckily I had some leftover seed of 7 of the 13 varieties (lucky old 13, eh?) that I had planned to grow that I now get to re-grow. Woo.
Well, if things go poorly again in about a week or so, then I'm just going to have to buy some plants. And that would just make me want to express myself in words that I can't/shouldn't post on this blog.
Anywhos, I left the remaining potentially survivable (we'll see) seedlings on a tray on the ground away from my platform of newly sown seeds just in case damping off fungus spores want to travel and infect others like vampires. I returned a few hours later to have a look-see at my pathetic seedlings when I noticed that there was a disturbance in one pot-verse:

A little bit closer...

*SIGH*
I watered the plants a bit taking care to give the toad a bit of a cold shower and wandered at why the heck it didn't choose some of shadier regions of the garden that are relatively plentiful (and easier to get into).
I figured this was a lesson learned so I raised the crummier seedling tray up a bit on some bricks, took out the toad inhabited pot and left it on the ground so when Mr. Toad (where was Mr. Frog?) decided to hop on out he didn't have to go mini-skydiving in the process.
Naturally, when I took out Mr. Toad's pot the scamp then decided to vacate.
*SIGH* (again)
I'm sure we'll meet again Toad (most likely in one of my other pots or plots.
Wednesday, March 31, 2010
We're rolling, rolling, rolling: Tea Rolling
A while ago I pruned my tea tree (Camellia sinensis) down a bit as it was done flowering because that's when I heard it was best to do so. Since then I've heard potentially other reports as to when to go about it and now I'm a little conflicted and worried, but if anyone has any advice, feel free to give it here.
Anyways, I pruned the darn thing as much as I hated to do so, because everything looks so sad when it's pruned and now I have to wait for new growth, which is the point of course, to create new and exciting branches that will increase my tea leaf load in the future.
I had read that I should prune it a few inches from the ground (pot in my case) but that just was so severe that I decided to demur on that advice and just did about half the plant. Bah, I need to be more of a risk taker don't I?
The leftover prunings I saved to attempt to root up and thus be able to have more tree trees/shrubs/plants in the future for my use and as gifts for friends. Cross fingers!
Many of the leaves I stripped, while older than for usual tea drinking use, I really did want to give it a go. If I only did that one bud and 2 leaves thing that apparently all great tea is made from I'd have very little new growth and probably only a couple good cuppas a year, so I've been biding my time.
My methods were pretty crude and my steps not exact I know: I rolled and pan fried the leaves, rather than roll them at the final step...but hey, still homemade green tea and hopefully things will be better the more I do it, right?!
My wonderful husband went through the effort of helping me figure out the rolling process, which was first awkward as I just literally rolled the leaf, then I made little balls that didn't hold their shape and finally we figured out a cool pretzel-ly thing:


It's necessary to allow the leaves to wither first for a day or 2 so that they are not so turgid and brittle for rolling. After that you want to pan fry or fire the leaves to stop oxidation (for green tea at least) and I'm sure to drive off water that might cause fungus or mold which is not only bad for flavor, but also potentially bad for one's health (funny, 'cuz this is the much touted health benefit drink). Lastly you roll the leaves (the firing and rolling, I got inverted), probably more for a shape and storage aspect in green tea, because whole open leaves take up lots of room. In other tea types, like oolong, the leaves are rolled prior to firing, to rupture leaf cell walls and give more flavor.
So what I made was like a weird white and oolong combination...?!
I pan fried my rolled leaves and they took on an interesting characteristic: the leaves got slightly shiny from oil I can only surmise that came from the leaves (unless the pan was not perfectly clean and there was residual oil in it) and they got obviously drier, but emitted a floral, nutty toasty smell that was quite delish to my nose.
I had saved some non-pan fried leaves and made myself a cuppa tea:


There was so little to no color and I was worried that there would be no flavor, but WHOA was there flavor! Oddly seaweed-like and fresh, grassy but slightly musky at the same time?! (Musky possibly not so good to some, but I don't mind it, or maybe I totally screwed something up here).
Either way, the unfired stuff was interesting, so I can't wait to see what the fired stuff will be like!
Interesting links:
http://en.wikipedia.org/wiki/Tea_processing
http://www.o-cha.com/green-tea-processing.htm
http://www.enjoyingtea.com/teaprocessing1.html
Anyways, I pruned the darn thing as much as I hated to do so, because everything looks so sad when it's pruned and now I have to wait for new growth, which is the point of course, to create new and exciting branches that will increase my tea leaf load in the future.
I had read that I should prune it a few inches from the ground (pot in my case) but that just was so severe that I decided to demur on that advice and just did about half the plant. Bah, I need to be more of a risk taker don't I?
The leftover prunings I saved to attempt to root up and thus be able to have more tree trees/shrubs/plants in the future for my use and as gifts for friends. Cross fingers!
Many of the leaves I stripped, while older than for usual tea drinking use, I really did want to give it a go. If I only did that one bud and 2 leaves thing that apparently all great tea is made from I'd have very little new growth and probably only a couple good cuppas a year, so I've been biding my time.
My methods were pretty crude and my steps not exact I know: I rolled and pan fried the leaves, rather than roll them at the final step...but hey, still homemade green tea and hopefully things will be better the more I do it, right?!
My wonderful husband went through the effort of helping me figure out the rolling process, which was first awkward as I just literally rolled the leaf, then I made little balls that didn't hold their shape and finally we figured out a cool pretzel-ly thing:


It's necessary to allow the leaves to wither first for a day or 2 so that they are not so turgid and brittle for rolling. After that you want to pan fry or fire the leaves to stop oxidation (for green tea at least) and I'm sure to drive off water that might cause fungus or mold which is not only bad for flavor, but also potentially bad for one's health (funny, 'cuz this is the much touted health benefit drink). Lastly you roll the leaves (the firing and rolling, I got inverted), probably more for a shape and storage aspect in green tea, because whole open leaves take up lots of room. In other tea types, like oolong, the leaves are rolled prior to firing, to rupture leaf cell walls and give more flavor.
So what I made was like a weird white and oolong combination...?!
I pan fried my rolled leaves and they took on an interesting characteristic: the leaves got slightly shiny from oil I can only surmise that came from the leaves (unless the pan was not perfectly clean and there was residual oil in it) and they got obviously drier, but emitted a floral, nutty toasty smell that was quite delish to my nose.
I had saved some non-pan fried leaves and made myself a cuppa tea:


There was so little to no color and I was worried that there would be no flavor, but WHOA was there flavor! Oddly seaweed-like and fresh, grassy but slightly musky at the same time?! (Musky possibly not so good to some, but I don't mind it, or maybe I totally screwed something up here).
Either way, the unfired stuff was interesting, so I can't wait to see what the fired stuff will be like!
Interesting links:
http://en.wikipedia.org/wiki/Tea_processing
http://www.o-cha.com/green-tea-processing.htm
http://www.enjoyingtea.com/teaprocessing1.html
Monday, March 29, 2010
*To the Smurf theme* La, la, la la la la! La, la la la LAVENDER!
A moment of brilliancy hit upon me a couple of days ago.
I've been pruning my Munstead lavender quite a bit as of late, noting its sad misshapen Quasimodo-esque appearance, trying to free it up so that the inner new growth will look fantastic rather than blob-tastic. (BTW, if anyone can direct me to a miniature Notre Dame Cathedral that is weather hardy, that would be EXCELLENT to place next to my lavender).
After some massive pruning, I saved some of the small pruned bits to soak in vinegar for a hair rinse and then looked at the massive amount of leftover cuttings.
I can't bear to throw anything away if it can be propagated ('cuz that's just what I do) so I wondered if they might root up easily and after a couple of weeks and some new growth coming from the pot of cuttings, that answer would be a very easy YES.
Awesome. But what to do with all this lavender other than gifts?! This is the epiphany... as I've been trying to go a little prettier in my garden and attract pollinators, I will outline my somewhat unattractive wood raised beds with the lavender and make mini-lavender hedges!
Ta da!
As with many things I've learned in life, and in my home, when something doesn't look good, cover/hide it until it does.
As it turns out, research on Google proved this to not be an entirely unique idea, but rather than just edging, I plan to keep it neatly trimmed all the time. Besides, if I don't, I won't be able to reach into my beds with my short little arms anyways. (Flashback to 3 years ago: Me to my husband building the beds, "Those look a little wide... I can't reach really well into the center..." fuzzy past blurble something response from husband that probably equates to an "oh well!" or "Grow longer arms!" :P)
As it turns out too, the lavender I have: Munstead and a random clearance Spanish lavender I picked up on the cheap at Lowe's/Home Depot is perfect for edging because it's naturally lower growing. Talk about weird luck eh?
I'll probably start out in the corners of the raised beds and maybe a little in the center of the sides, ignoring the far back facing north side because of the amount of shade and potentially ignoring too the skinny center path between the beds just so I can be sure I have plenty of walking room.
So excited now about this project (until I have to maintain it of course...)! I hope by the end of fall it will look great!
I've been pruning my Munstead lavender quite a bit as of late, noting its sad misshapen Quasimodo-esque appearance, trying to free it up so that the inner new growth will look fantastic rather than blob-tastic. (BTW, if anyone can direct me to a miniature Notre Dame Cathedral that is weather hardy, that would be EXCELLENT to place next to my lavender).
After some massive pruning, I saved some of the small pruned bits to soak in vinegar for a hair rinse and then looked at the massive amount of leftover cuttings.
I can't bear to throw anything away if it can be propagated ('cuz that's just what I do) so I wondered if they might root up easily and after a couple of weeks and some new growth coming from the pot of cuttings, that answer would be a very easy YES.
Awesome. But what to do with all this lavender other than gifts?! This is the epiphany... as I've been trying to go a little prettier in my garden and attract pollinators, I will outline my somewhat unattractive wood raised beds with the lavender and make mini-lavender hedges!
Ta da!
As with many things I've learned in life, and in my home, when something doesn't look good, cover/hide it until it does.
As it turns out, research on Google proved this to not be an entirely unique idea, but rather than just edging, I plan to keep it neatly trimmed all the time. Besides, if I don't, I won't be able to reach into my beds with my short little arms anyways. (Flashback to 3 years ago: Me to my husband building the beds, "Those look a little wide... I can't reach really well into the center..." fuzzy past blurble something response from husband that probably equates to an "oh well!" or "Grow longer arms!" :P)
As it turns out too, the lavender I have: Munstead and a random clearance Spanish lavender I picked up on the cheap at Lowe's/Home Depot is perfect for edging because it's naturally lower growing. Talk about weird luck eh?
I'll probably start out in the corners of the raised beds and maybe a little in the center of the sides, ignoring the far back facing north side because of the amount of shade and potentially ignoring too the skinny center path between the beds just so I can be sure I have plenty of walking room.
So excited now about this project (until I have to maintain it of course...)! I hope by the end of fall it will look great!
Saturday, March 27, 2010
Wishing and hoping and thinking and praying...planning and dreaming...
...of some plants...
(to come my way or be in the area for reasonable price...)
specifically:
-fuchsia (the edible kinds)
-bamboo (UPDATE: A nice reader gave me some plants! woot! Sis in law offering too, hurray!)
-luffah squash (EDIBLE, btw! Sad though because I can't grow it since I'm waiting a year to ride myself of borers...!)
-martynia (so cool looking on M.E.N.)
-winged beans
-cardoon
-every scented geranium ever (Dangit! Goodwin Creek is having a sale *sniffle*)
-ok, I take it back, everything on this Mother Earth News heirloom plants link
-um, and probably every herb from Richter's
-curry tree
-spicebush (delicious sounding!)
-sweet woodruff
-ranunculus (they're pretty spiffy looking and awesome sounding when it rolls around in your mouth) (UPDATE: Home Depot had a buy one bulbs package get 2nd free! A friend was so kind to help indulge my bulb lust. Blooms in June! *cross fingers!*)
-aconite (need something to break the blah-ness of winter)
-more daffodils! (My grandmother, when I was little gave me a tiny bottle of perfume, Diorissimo I think, that smelled like daffodils I thought. I never used it as I don't like wearing perfume, but I loved to sniff it. The perfume went missing one day and I've never encountered it since. Daffodils also remind me of the Wordsworth poem, a favorite of mine) (UPDATE: more sis in law kindness!)
So, if anyone is aware of any of these plants just hanging around or being sold in the area or are in need of thinning, I'm here, waiting with bated breath and trowel to help out with some thinning or at least will know where I could eventually purchase these pretties!
(to come my way or be in the area for reasonable price...)
specifically:
-fuchsia (the edible kinds)
-
-luffah squash (EDIBLE, btw! Sad though because I can't grow it since I'm waiting a year to ride myself of borers...!)
-martynia (so cool looking on M.E.N.)
-winged beans
-cardoon
-every scented geranium ever (Dangit! Goodwin Creek is having a sale *sniffle*)
-ok, I take it back, everything on this Mother Earth News heirloom plants link
-um, and probably every herb from Richter's
-curry tree
-spicebush (delicious sounding!)
-sweet woodruff
-
-aconite (need something to break the blah-ness of winter)
-
So, if anyone is aware of any of these plants just hanging around or being sold in the area or are in need of thinning, I'm here, waiting with bated breath and trowel to help out with some thinning or at least will know where I could eventually purchase these pretties!
Friday, March 26, 2010
Hellebores aren't a bore!
Hellebores, aka Lenten Roses are what keeps me going in crummier times when the weather reverts back to rainy, colder nastiness.

It's a tough plant that makes me think of s bike chick or something, with those leathery dark green sharply serrated leaves, the older ones often scarred and slightly tattered up (if you leave them as long as I do in their au naturale state, not pruning off the old bits).
It's interesting to watch the stages of the flower development, sometimes a difficult task as their heavy heads are always drooping towards the ground. The young "flowers" (I suppose like most flowers at their best) are at my favorite stage with their yellow green cupped circle of the hellebore's true flowers. The larger petal-y areas surrounding the flowers are actually the sepals/calyces of the plant, usually a longer lasting section of a plant than true flower petals. Bells of Ireland are another plant I like that with a similar "flower" concept.

Later when the "flowers" get older the inner true flower shrivels up and a pod fills the inside of the sepals, which is equally pretty and I will try to document.
Here's some more pics of my Hellebores on a nicer day (pardon the sort or repetition, I often find subtle differences in light or angle that make them interesting to me. Also, as always, click on pic to expand):


It's a tough plant that makes me think of s bike chick or something, with those leathery dark green sharply serrated leaves, the older ones often scarred and slightly tattered up (if you leave them as long as I do in their au naturale state, not pruning off the old bits).
It's interesting to watch the stages of the flower development, sometimes a difficult task as their heavy heads are always drooping towards the ground. The young "flowers" (I suppose like most flowers at their best) are at my favorite stage with their yellow green cupped circle of the hellebore's true flowers. The larger petal-y areas surrounding the flowers are actually the sepals/calyces of the plant, usually a longer lasting section of a plant than true flower petals. Bells of Ireland are another plant I like that with a similar "flower" concept.
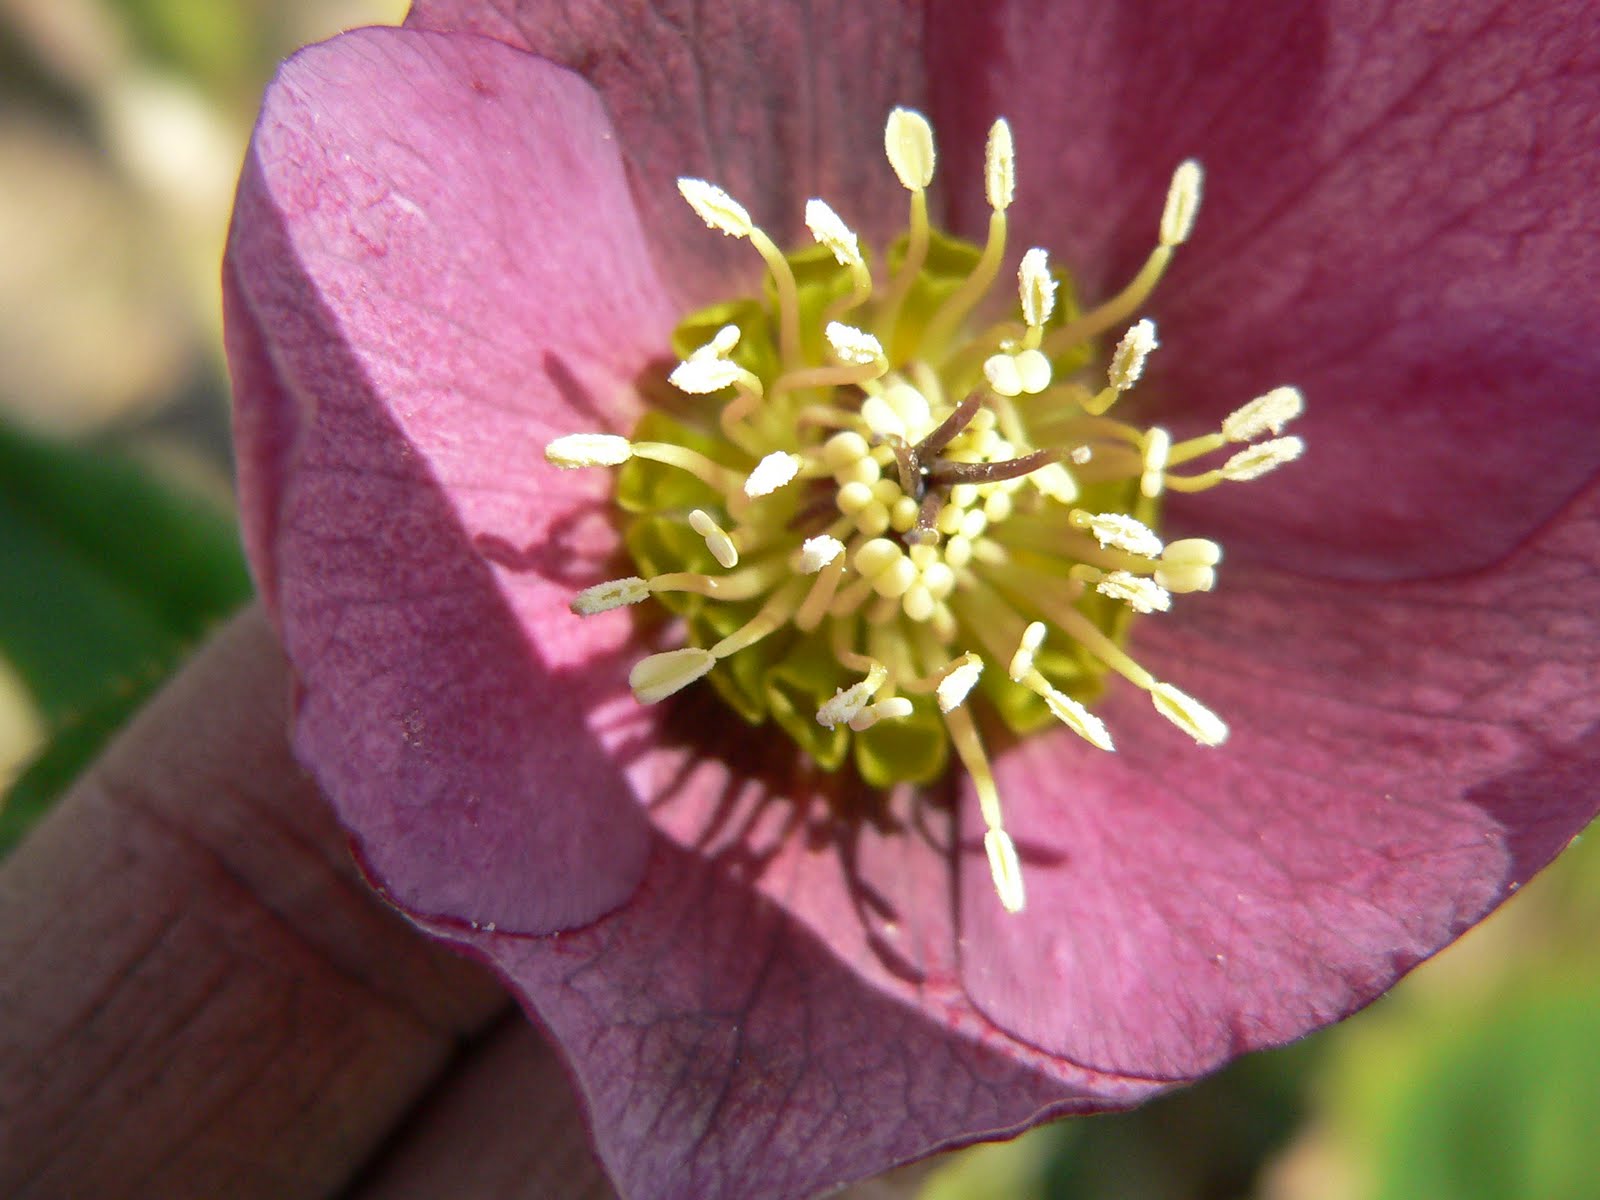
Later when the "flowers" get older the inner true flower shrivels up and a pod fills the inside of the sepals, which is equally pretty and I will try to document.
Here's some more pics of my Hellebores on a nicer day (pardon the sort or repetition, I often find subtle differences in light or angle that make them interesting to me. Also, as always, click on pic to expand):


Thursday, March 25, 2010
Fickle things: Ladybugs
I've been slowly taking indoor plants into the screened sunroom where the air and slight light change will hopefully acclimate them to the outdoors before I thrust them entirely out there to fend for themselves.
One plant that I've been aching to chuck out is my ornamental pepper, Black Pearl.
Out of all of my plants, the ornamental peppers have suffered greatly from an aphid infestation that I couldn't shake this winter despite repeated neem sprayings until I simply killed the Tricolore garda and then the Purple Calico soon thereafter (which I think got water logged and rotted too... my bad, I had a container that was spiffy and thought I'd be good at not overwatering. Crud.)
The Black Pearl has held out pretty well out of all of them and was attacked last. I didn't know of the infestation for quite a while I think because the new leaves on it are this lighter green the aphids hid in. Later when they moved on to the darker purple leaves/stems did I CLEARLY see them.
Learning from my prior neem frenzy with the now dead other ornamental peppers (and there was poor light, and it's been cold in the house! They were weakened I say! Weakened!) I just started snipping off the severely infested bits and made a good effort to check every day and squish any aphid stragglers. Ick, that was a sticky mess.
So, as the weather appears to be more regularly now, I moved it into the sunroom and lo and behold, there was a a LADYBUG on the screen area, basking in the sunshine.
I promptly snatched it up and thought, "Haha! Now I've got you, you stinking aphids! Meet my leetle friend!"
Then placed the ladybug onto Black Pearl. AND, like all ladybugs it tried to fly away.
So I put it back on the plant. It attempted to fly away again, but hit a leaf above it (brilliant bug, obviously). Either ladybugs have a bad sense of smell/sight because I placed it on a plant with a veritable feast in front of it, and it didn't care. After this long and starved winter? What gave?!
Luckily it appeared to start sniffing around and moving its mouth parts like it was really getting at stuff and began to explore the territory.
"PERFECT! It's like my own aphid ROOMBA!" I sort of cackled in my head and rushed off to get a pic of this momentous occasion.
When I got back the ladybug had decided to fly off and thus, no pic could be got.
Then I found a small stem COVERED in aphids and got a bit huffy and chucked the Black Pearl outside in a sheltered location. Here's where I do a little prayer hoping that the aphids will not like the weather and just melt down or something (like be discovered by smart ladybugs) and allow my Black Pearl to continue growing merrily along.
In the mean time, I've started some new Tricolore Garda and Purple Calico ornamental peppers from seed again. Luckily for me, those things really put out little pepper fruits!
One plant that I've been aching to chuck out is my ornamental pepper, Black Pearl.
Out of all of my plants, the ornamental peppers have suffered greatly from an aphid infestation that I couldn't shake this winter despite repeated neem sprayings until I simply killed the Tricolore garda and then the Purple Calico soon thereafter (which I think got water logged and rotted too... my bad, I had a container that was spiffy and thought I'd be good at not overwatering. Crud.)
The Black Pearl has held out pretty well out of all of them and was attacked last. I didn't know of the infestation for quite a while I think because the new leaves on it are this lighter green the aphids hid in. Later when they moved on to the darker purple leaves/stems did I CLEARLY see them.
Learning from my prior neem frenzy with the now dead other ornamental peppers (and there was poor light, and it's been cold in the house! They were weakened I say! Weakened!) I just started snipping off the severely infested bits and made a good effort to check every day and squish any aphid stragglers. Ick, that was a sticky mess.
So, as the weather appears to be more regularly now, I moved it into the sunroom and lo and behold, there was a a LADYBUG on the screen area, basking in the sunshine.
I promptly snatched it up and thought, "Haha! Now I've got you, you stinking aphids! Meet my leetle friend!"
Then placed the ladybug onto Black Pearl. AND, like all ladybugs it tried to fly away.
So I put it back on the plant. It attempted to fly away again, but hit a leaf above it (brilliant bug, obviously). Either ladybugs have a bad sense of smell/sight because I placed it on a plant with a veritable feast in front of it, and it didn't care. After this long and starved winter? What gave?!
Luckily it appeared to start sniffing around and moving its mouth parts like it was really getting at stuff and began to explore the territory.
"PERFECT! It's like my own aphid ROOMBA!" I sort of cackled in my head and rushed off to get a pic of this momentous occasion.
When I got back the ladybug had decided to fly off and thus, no pic could be got.
Then I found a small stem COVERED in aphids and got a bit huffy and chucked the Black Pearl outside in a sheltered location. Here's where I do a little prayer hoping that the aphids will not like the weather and just melt down or something (like be discovered by smart ladybugs) and allow my Black Pearl to continue growing merrily along.
In the mean time, I've started some new Tricolore Garda and Purple Calico ornamental peppers from seed again. Luckily for me, those things really put out little pepper fruits!
0
comments
 Labels:
aphids,
black pearl,
calico,
ladybugs,
ornamental peppers,
purple,
tricolore garda
Labels:
aphids,
black pearl,
calico,
ladybugs,
ornamental peppers,
purple,
tricolore garda
Labels:
aphids,
black pearl,
calico,
ladybugs,
ornamental peppers,
purple,
tricolore garda
Wednesday, March 24, 2010
I feel like a weird voodoo priestess or something
GAH. The seeds in the mini greenhaus have been coming along merrily, even the purple calico ornamental pepper (I've determined ir's that one rather than mixing it up with the tricolore garda, as the leaves are purple), EXCEPT I noticed that last couple days that a couple seedlings keeled over.
GOSH DAMP IT! It looks like there's some damping off going on. I've possibly been a little too water bottle spray happy and the cracks in the plastic of my geenhaus obviously have not done a great job venting (I know, not their purpose, but I still had hope). I also had been gone for a while and got carried away by other household things I probably was not opening up, checking and airing out the seedlings enough as I should.
I've pulled out the sad flopped over seedlings, only 2 and it looks like that they're all purple calico peppers and it hasn't spread too much I hope.
As a potentially too late method to prevent further damage I'm taking one from the Gayla Trail/Martha Stewart advice book (not a collaboration, just things they've mentioned in the past) that I constantly forget to use: CINNAMON.
So, there I was with a palm full of cinnamon in front of my little seedlings just blowing all this powdered cinnamon into the greenhaus box and on the seedlings and surface of their dirt in fervent prayer that this will protect them or heal them and whatnot. It reminded me of all those cheesy stereotypical scenes from movies that had an indigenous medicine man/woman blowing some sort of mystical powder on their patient or something.
Everything in there smells delicious at least.
*sigh* If I had been smart I'd have blown the cinnamon on top of the surface of the pots BEFORE I plant the seeds. I've never really had a damping off problem before, so I'll just hope that it doesn't proceed to total seedling meltdown. My own personal tomato/pepper/tomatillo Chernobyl I swear.
GOSH DAMP IT! It looks like there's some damping off going on. I've possibly been a little too water bottle spray happy and the cracks in the plastic of my geenhaus obviously have not done a great job venting (I know, not their purpose, but I still had hope). I also had been gone for a while and got carried away by other household things I probably was not opening up, checking and airing out the seedlings enough as I should.
I've pulled out the sad flopped over seedlings, only 2 and it looks like that they're all purple calico peppers and it hasn't spread too much I hope.
As a potentially too late method to prevent further damage I'm taking one from the Gayla Trail/Martha Stewart advice book (not a collaboration, just things they've mentioned in the past) that I constantly forget to use: CINNAMON.
So, there I was with a palm full of cinnamon in front of my little seedlings just blowing all this powdered cinnamon into the greenhaus box and on the seedlings and surface of their dirt in fervent prayer that this will protect them or heal them and whatnot. It reminded me of all those cheesy stereotypical scenes from movies that had an indigenous medicine man/woman blowing some sort of mystical powder on their patient or something.
Everything in there smells delicious at least.
*sigh* If I had been smart I'd have blown the cinnamon on top of the surface of the pots BEFORE I plant the seeds. I've never really had a damping off problem before, so I'll just hope that it doesn't proceed to total seedling meltdown. My own personal tomato/pepper/tomatillo Chernobyl I swear.
Subscribe to:
Posts (Atom)

